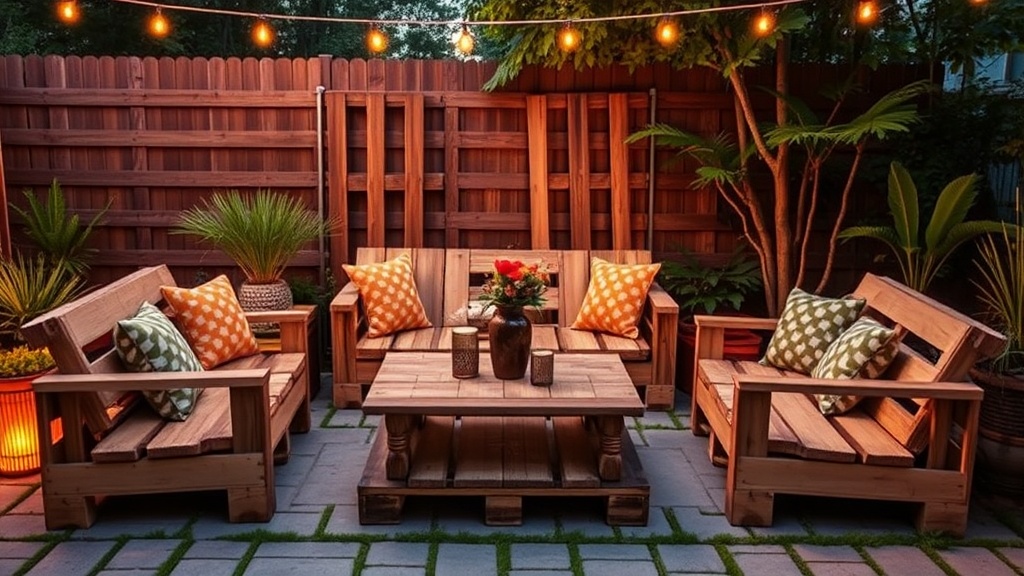
Repurposing Old Wooden Pallets into Chic Outdoor Furniture

The scent of cedar and damp earth fills the air as you pull a heavy, weathered wooden pallet from the side of a warehouse. It’s rough, graying, and looks like nothing more than scrap wood. Yet, with a bit of grit and a sander, that same piece of debris becomes the base for a high-end outdoor sectional or a rustic coffee table. This post explores how to transform discarded shipping pallets into high-quality outdoor furniture while ensuring your new pieces are safe, durable, and aesthetically pleasing.
Most people see a pile of junk. I see a potential centerpiece for a backyard gathering. Using reclaimed wood is a way to keep high-quality timber out of landfills and keep your budget intact. It’s a way to build something that actually looks like it belongs in a high-end garden catalog, rather than something that looks like it was pulled straight from a construction site.
How Do I Know If a Pallet Is Safe to Use?
You must check the stamps on the side of the pallet to ensure they are not treated with harmful chemicals. Look specifically for the HT (Heat Treated) mark, which means the wood was heated to kill pests rather than soaked in toxic chemicals. Avoid any pallets marked with MB (Methyl Bromide), as this is a highly toxic pesticide that is dangerous to handle and breathe near.
Safety is the one area where you cannot cut corners. If you aren't 100% sure about the origin of the wood, don't use it. I’ve seen people try to build garden beds out of old pallets only to realize later that the wood was treated with chemicals that can leach into the soil. If you're building something that touches the ground or near your vegetable garden, be extra cautious. You can check the Wikipedia entry on pallets to understand more about the various types of wood treatments and international shipping standards.
Here is a quick checklist for your next salvage run:
- HT Stamp: Safe to use (Heat Treated).
- KD Stamp: Safe to use (Kiln Dried).
- MB Stamp: Avoid at all costs (Methyl Bromide).
- Color/Texture: If the wood looks unnaturally green or has a strange oily sheen, walk away.
- Integrity: Avoid pallets with heavy rot or deep structural cracks.
Finding the right wood is just the start. Once you have a safe pallet, the real work begins with the prep work.
What Tools Do I Need to Build Pallet Furniture?
A basic toolkit consisting of a hammer, a crowbar, a sander, and a drill is enough to complete most pallet projects. You don't need a full woodshop to make something beautiful, but you do need the right gear to make it safe and smooth.
First, you'll need to disassemble the pallet. A standard claw hammer and a heavy-duty pry bar (sometimes called a crowbar) are your best friends here. Pulling those nails out is the most frustrating part of the process—honestly, it's the part I hate most—but it's necessary to get clean boards. Once the pieces are separated, you'll need a sander to remove the splinters and rough edges. I personally recommend an orbital sander for the flat surfaces and a detail sander for the corners.
The following table compares the most common types of finishes you might use for your outdoor furniture:
| Finish Type | Best For | Pros | Cons |
|---|---|---|---|
| Outdoor Polyurethane | Coffee Tables | Highly water-resistant; looks polished. | Can peel if not applied correctly. |
| Teak Oil | Rustic Seating | Natural look; easy to apply. | Needs frequent re-application. |
| Exterior Paint | Accent Pieces | Great for color; hides imperfections. | Can look "cheap" if the wood is too rough. |
| Linseed Oil | Small Decor | Eco-friendly and natural. | Slow drying time; not great for heavy rain. |
If you're building something that will sit on a patio, I'd suggest looking into high-quality outdoor sealants. Brands like Minwax or Varathane offer specific exterior versions that can withstand the elements. If you're working in an urban environment with limited space, you might want to consider how your furniture interacts with your garden layout. I recently wrote about cultivating abundance through vertical garden innovation, which is a great way to add greenery around your new pallet seating.
The Step-by-Step Process
1. Deconstruction: Carefully pry the boards apart. Use a hammer to tap the crowbar into the gaps between the slats. Do not force it, or you'll snap the wood.
2. Cleaning: Scrub the boards with a stiff brush and a bit of soapy water to remove dirt and grime. Let them dry completely in the sun.
3. Sanding: Start with a coarse grit (around 60 or 80) to get the surface level. Finish with a fine grit (120 or 150) so it doesn't feel like sandpaper when someone sits on it.
4. Assembly: Use exterior-grade wood screws. Standard nails will eventually pull out as the wood expands and contracts with the weather.
5. Sealing: Apply your chosen finish. Do at least two coats for maximum protection.
How Can I Make Pallet Furniture Last Longer?
Applying a heavy-duty outdoor sealant and keeping the wood off the direct ground is the most effective way to extend the life of your furniture. Even with the best treatment, wood that sits in a puddle will eventually rot. This is why I always recommend adding small feet or "glides" to the bottom of your pallet furniture. These can be simple plastic furniture feet or even small pieces of pressure-treated wood.
The weather in Detroit—and most urban areas—can be brutal. One day it's baking in the sun, and the next, we're dealing with heavy rain. This constant expansion and contraction is what breaks down the wood fibers. If you're building a lounge chair, consider adding a high-quality cushion. Using something like a Sunbrella fabric cushion will protect the wood from spills and make the piece much more comfortable.
One thing to keep in mind is the weight. Pallet furniture can get quite heavy once it's assembled and treated. If you're building a large sectional, make sure your patio or deck can handle the load. If you're working with raised beds or heavy planters nearby, you might want to check out my guide on weather-resistant materials for urban raised beds to see how different materials behave in the garden.
If you find that your furniture is starting to look a bit dull after a season or two, don't panic. A quick light sanding and a fresh coat of oil or stain can bring the life back into it. It's much easier to maintain than it is to replace. Just keep an eye on the joints; if you see any gaps forming, add a few more exterior screws to keep everything tight.
The beauty of this project isn't just the finished product. It's the fact that you took something that was destined for a landfill and turned it into a functional, beautiful part of your home. It's a small win for the planet and a big win for your backyard aesthetic.